Friday, May 31, 2013

Tuesday, May 28, 2013
Starting Sweet Potatoes in the Garden
A few years ago when I began working with sweet potatoes, I preferred to grow out the slips from sweet potatoes cut halfway in a jar. However, as I have experimented with different techniques I have found that starting sweet potatoes in sand or soil is much faster, howbeit a bit more complicated.
 |
| Putting Sweet potatoes out for transplants |
 |
| Placing the sweet potatoes in the Garden |
 |
| Purple Sweet Potatoes for Slips |
So – what makes
starting sweet potato slips in the garden tricky? Disease, nematodes, and
various other factors have led to farmers to grow out small plants (or slips)
from sweet potatoes rather than planting the tubers themselves. Transplanting
sweet potato slips can be a rather simple process in a very moderate climate
(where sweet potatoes do not grow well). In contrast, in hot southern climates (where
sweet potatoes grow very well) transplanting can be much more difficult. This
is because by the time the slips are ready to plant in May the 100ᵒ Fahrenheit (38ᵒ Celsius) daytime heat
cooks the roots of the sweet potatoes down through the first 6 inches of soil.
This means that either the roots must be very long or the plants must be given
additional care until they establish themselves.
 |
| All Purple Sweet Potato Slips |
My experience this
last month with growing and transplanting sweet potato vines has taught me that
transplanting slips requires timing, hardening off, and recovery time. By
timing I mean that I have found that it helps to transplant the slips in the
evening. By doing this, it gives the roots a little more time to enjoy cool
soil before the sun and heat begin to stress the plant. In very hot climates
sweet potato slips need to be hardened off before they are exposed to the full
sun. Until the plants stop wilting, temporary shading really helps to give the
roots time to grow and helps to “harden off” the plant. Even with planting at
night and shading, it may still take several weeks until sweet potato slips are
ready for the intense heat of the Arizona sun.
| Sweet Potato Slips recovering |
| More recovering Sweet Potato Slips |
One other
nonconventional means of transplanting sweet potatoes is the growing of sweet
potato slips from tubers in the garden, then removing the tubers from the
garden. This is the opposite idea of transplanting slips. With this method I
mark (with a stick or some other marker) where I want to plant a very healthy
disease-free sweet potato. Then, I put the sweet potato in the ground and cover
it with garden soil. I then water it, just as she would any other plant in the
garden. Next, I wait until the sweet potato grows out and the plant becomes
established. Once the plant is about 18” long, then you carefully poke around
for the potato and (with a fingernail or another sharp object) I remove any
vines from the potato. Then I pull out the original sweet potato and fill in
the hole with soil. With this method, you have to be very careful to keep from
disturbing the roots of the growing slips. By doing this, you can keep from
losing the 2-3 weeks of shock and recovery required when transplanting the
sweet potato slips.
| Several weeks later - the vines have recovered |
 |
| Sweet Potatoes Started in the Garden - with tubers removed |
Tuesday, May 21, 2013
The Carosello Massafra
 |
| Carosello Massafra Seedling - Late March |
 |
| Cut paper towel roll to protect against cutworms |
In general, melon varieties (C. melo) that are cultivated as cucumbers do well in the heat. While my regular cucumber varieties (C. sativus) wilt during very hot times of the day, my Carosello never do.
 |
| Carosello Massafra - April 11th |
 |
| Another C. Massafra on April 11th |
There is a regular pattern with all the cucumber-melons that I have grown so far, so that I know about when to expect to see both the male and female flowers.
 |
| Trellising Carosello plants on Tomato Cages |
 |
| Carosello Massafra - May 6th |
 |
| The Carosello Massafra produces melon flowers |
 |
| Carosello Massafra cucumbers |
 |
| Carosello Massafra melons around May 20th |
Last Saturday I picked
some Massafra fruit for a taste test. One of my children recently tested
positive for an allergy to cucumbers and pickles (C. sativus). Luckily he
tested negative to an allergy to melons (C. melo), so he was able to help me
with my Massafra taste test.
 |
| Maturing Carosello Massafra melon |
So – how did they taste? My best description is
super-juicy on the inside and lightly crispy-crunchy on the outside. The taste
was that of any other freshly picked cucumber. In short, it was delicious.
 |
| Morning Munching of Massafra Melons - say that 10 times fast! (= |
Angelo and my other Italian gardening friends at Amicidellortodue will have to forgive me for stealing their idea in some of the photographs that I took of my Carosello Massafra.
Recently, I found a really good page on making a summer salad with this variety and the Massafrese - howbeit the translation for the carosello variety "Barattiere" Google translated as "swindlers". This has to do with the nickname of that variety of carosello which, I am told, has more to do with the personality of the farmer who invented the variety than with the carosello variety itself.
 |
| The Carosello Tondo Massafra |
Tuesday, May 14, 2013
Hand Pollinating Melons
At the beginning of
each summer it often takes a while for Tucson’s wild (and domestic) bees to
find the flowers in my garden. Often, during this time of year, I look around
my yard wondering where the bees are hiding and conclude that if I want my
vegetables pollinated then I will have to do it myself.
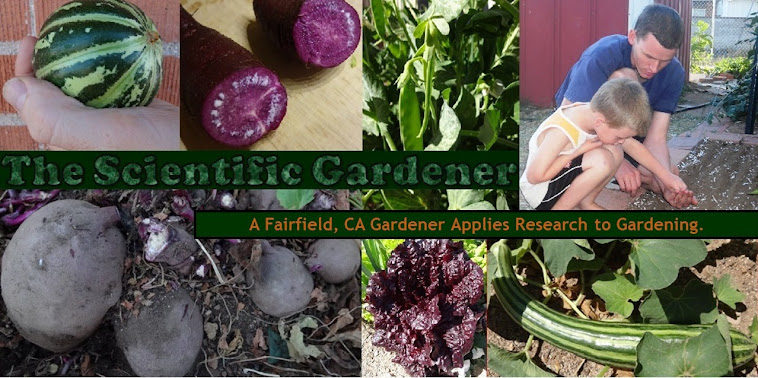
Members of the Curbitaceae family (Cucumbers, Melons, and Squash) are monoecious. The Latin of this name means “one house” and refers to the separation of the reproductive parts of the plant into individual male and female flowers that grow on the same plant. The technique of hand-pollinating monoecious vegetables is pretty straight-forward. Here are some pictures to aid in hand pollinating melon vines.
 |
| Male Melon Blossom - front view |
Members of the Curbitaceae family (Cucumbers, Melons, and Squash) are monoecious. The Latin of this name means “one house” and refers to the separation of the reproductive parts of the plant into individual male and female flowers that grow on the same plant. The technique of hand-pollinating monoecious vegetables is pretty straight-forward. Here are some pictures to aid in hand pollinating melon vines.
 |
| Male Melon Blossom - side view |
Before pollinating,
it is important to ensure that both male and female flowers in bloom. Male
flowers can be identified by the small short anthers with pollen in the middle
of the flower and the thin stem, devoid of bulging, leading up to the flower.
In contrast, female flowers exhibit a roundish folded stigma in the center of
the flower and a thicker immature shape which contains the unpollinated fruit.
 |
| A Female Melon Blossom with immature fruit (Left) |
Once the presence of
a male and female flower have been verified, then comes the pollinating itself.
With melon flowers I just pick the male flower, leaving as much stem as
possible attached, and pull back the petals to expose the anthers.
 |
| Pulling back the petals of the Male Blossom to expose the anthers |
 |
| Exposed Anthers of Male Blossom |
To pollinate, I
insert the male flower into the female flower just enough so that I can feel
that the male anthers just make contact with the female stigma. One technique I
found very effective to avoid damaging the female stigma is to gently rub the
male anthers around in the female flower to release the pollen. After
pollinating I then toss the male flower aside and hope for the best. If you desire
to increase chances that pollination will occur you can either pollinate again
with another male flower or you can wait until the next day to attempt the
process again. This will help you to overcome male pollen that is not viable or
a female flower that is not fully mature.
 |
| Pollinating Female Melon Blossom with male Anther |
In general, both male
and female flowers have a window of opportunity in which the bees (or people)
can complete the pollination process due to the limited timespan of male pollen
viability and female fruit receptivity. Male flowers lose their viability when
the flower petals turn a pale color and close, while unpollinated female
flowers are usually identified only after the fruit part of the stem turns
yellow wilts. In order to encourage consistent flower production, I regularly
remove any wilted fruit or pale flowers.
 |
| Female Melon blossoms progress (left to right): Immature, Pollinated, and Fruiting |
Pollinating your
plants may be necessary if you are growing in a greenhouse or if you need to
isolate a specific vegetable variety (cultivar) from another cultivar that you
are growing. If you are rouging or culling a specific variety for breeding
purposes, it is important to pollinate your own plants by selfing. Rather than
crossing plants using male and female flowers from different vines, selfing
isolates qualities of a specific plant by only pollinating female flowers with
male flowers of that specific plant. Once you have isolated the qualities of a
vegetable variety and produced seed, you can then replant that seed to create a
landrace (a large population of a variety that is adapted to your climate) by
crossing as many plants of the new variety as possible. The purpose of a
landrace is to keep future plants vigorous and strong by increasing genetic
variability within a given population. Lack of cross pollination within a
vegetable variety can weaken the variety and eventually lead to inbreeding depression.
So – why should a
gardener hand-pollinate their melons if there are no natural pollinators? To
watch as the female fruit grows.
 |
| A pollinated melon sets fruit and begins to grow. =) |
Saturday, May 11, 2013
Eureka!
 |
| Ripe tomatoes can sometimes be hard to find. |
I knew this tomato was there, and had been looking
for it under the bush for quite a while – and finally I found it!
 |
| The only hybrid in my garden - Celebrity |
Each year I compare heirloom tomato varieties to the one variety I continually strive to beat – Celebrity. So far, Celebrity is winning. Most everything in my garden is open pollinated and can outdo its hybrid counterpart – but I have a long way to go to beat this hybrid tomato variety.
Monday, May 6, 2013
Onion Blossoms
Onion Blossoms are so
pretty.


Friday, May 3, 2013
With Heat comes Reptiles
As my children get
older I find that they have inherited my tendency for catching lizards. My
younger son recently stated that when he grows up he wants to have a “lizard
ranch”.
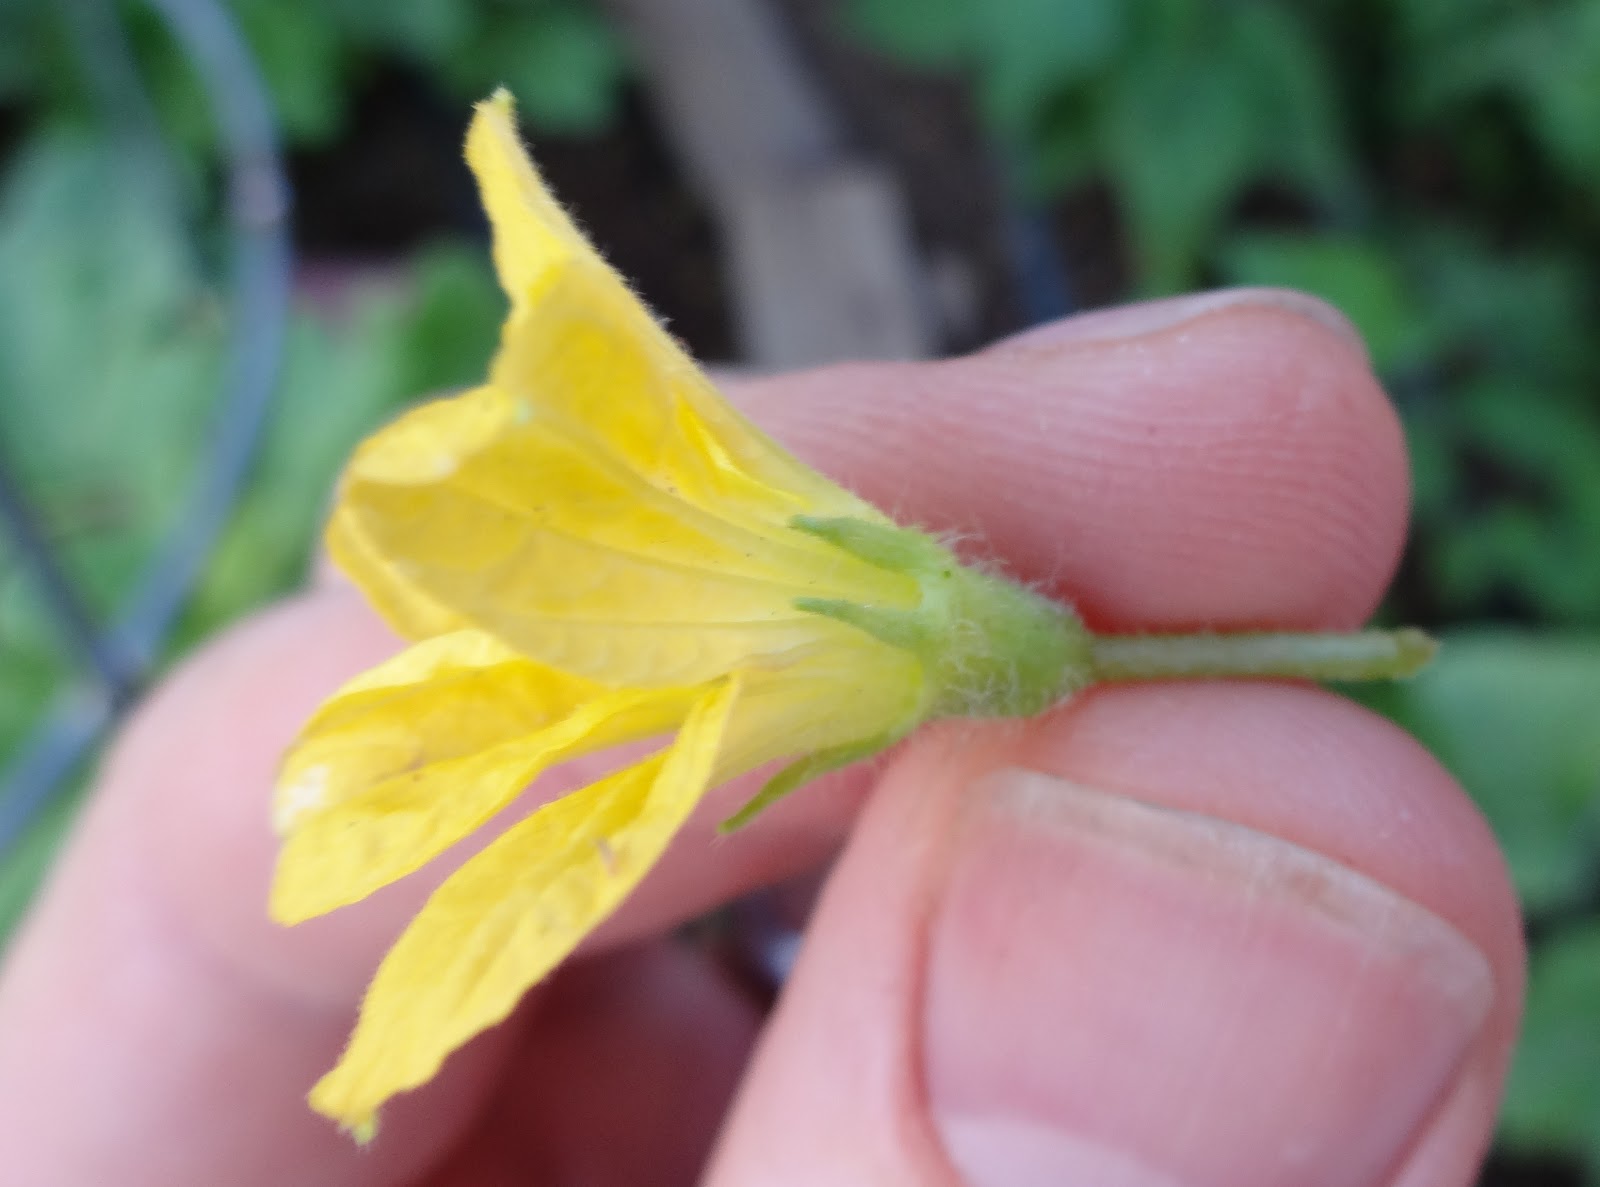
While rising summer temperatures increase, so does the activity of the reptiles outside. My children run after whiptails and fence lizards during by day and my wife and I enjoy seeing the geckos consume moths around our porch light at night.
This last week was the second time I saw a blind snake, while many people here in Tucson keep tame desert tortoises in their backyard. Reptiles are pretty well adapted to the Southwest and make our desert landscape much more interesting.
 |
| A young Spotted Whiptail Lizard about to go into my garden |
While rising summer temperatures increase, so does the activity of the reptiles outside. My children run after whiptails and fence lizards during by day and my wife and I enjoy seeing the geckos consume moths around our porch light at night.
 |
| This Blind snake does not want his picture taken |
This last week was the second time I saw a blind snake, while many people here in Tucson keep tame desert tortoises in their backyard. Reptiles are pretty well adapted to the Southwest and make our desert landscape much more interesting.
 |
| The Blind snake showing his head on his way off |
Subscribe to:
Posts (Atom)